

If you’ve ever wondered how to cut the cord and save money without losing the channels you actually watch, you’re in the right place. I’m going to show you exactly what I did—step by step—so you can see how this works in a real home, even in a rural area and even if you’re a retiree on a fixed income who’s tired of watching the TV bill go up.
For years, my TV streaming bill slowly crept up until it was almost $100 a month. Maybe you’ve seen the same thing: the “promo” rate ends, a new fee appears, or the price quietly jumps and you notice only when the bill hits. I was mostly watching local channels and a few favorites, but paying for a long list of channels I never touched. At some point, I said what you might be thinking now: There has to be a better way.
When I started digging into how to cut the cord and save money, I found out something important: a lot of homes can get dozens of free over‑the‑air (OTA) channels with the right antenna, even if they’re not near a big city. That’s a big deal if you’re trying to lower your monthly expenses, especially in retirement. In my case, the broadcast towers were about 35 to 52 miles away, all grouped in one direction. That meant I needed the right gear, but it also meant free TV was a real possibility—not just a theory.
Here’s what I ended up with:
- A setup that pulls in 148 OTA channels at my rural home
- Every TV in the house can watch, pause, and record live TV through a Tablo DVR
- Picture quality that actually looks better than what I had with streaming, with brighter, more vibrant colors
- A monthly TV cost that dropped from about $100 to under $5 (using a tiny Sling plan just for Fox News)
In the rest of this guide, I’ll walk you through exactly what I bought, how I installed it, what went wrong at first, and what finally made everything click. My goal is simple: to help you see how you can cut the cord and save money in a way that still feels modern, easy to use, and reliable—whether you’re in a rural area, a suburb, or carefully planning in retirement.
A Note for Adult Children Helping Their Parents
If you’re an adult son, daughter, or grandchild helping a parent or grandparent cut the cord and save money, this guide is for you too. You can think of it as a blueprint: your parent can read through the explanations to understand the “why,” while you handle the “how”—things like installing the RCA Signal Finder app, climbing the ladder, mounting the antenna, and running the cables. Working together, you can turn a confusing monthly TV bill into a simple, low‑cost setup that still feels modern and easy to use.
Start Here: Your First Two Steps
If you’re ready to start cutting the cord and saving money, here are the first two steps you should take before you touch a ladder or buy any equipment.
Step 1: Check Your Channels and Towers (with RCA Signal Finder)
Before you spend a dollar, you want to know what channels you can get and where your towers are.
- On your smartphone, install the RCA Signal Finder app.
- Open the app and enter your address.
- The app will show you:
- The exact direction of each TV tower from your home
- The distance to each tower
- Which channels (ABC, CBS, NBC, FOX, PBS, etc.) are coming from which direction
This step is important because it tells you whether:
- A directional antenna, like the RCA Yagi I used, is a good match for your home
- You’re far enough from the towers (like my 35–52 miles) that you’ll probably need a mast preamp to get strong, reliable signals
If you’re not comfortable with apps, this is a perfect place to ask a family member or friend to help. A grandson, son‑in‑law, or neighbor can usually get this done in a few minutes, and it will give both of you a clear picture of what’s possible.
Step 2: Decide If My Setup Fits Your Situation (and Who Will Help Install It)
Next, compare what the app shows you to my real‑world setup:
- My towers are roughly 35–52 miles away, mostly in one direction
- I use a directional RCA Compact Outdoor/Attic Yagi antenna
- I add a Televes mast preamp because of the distance and the need for strong, stable signals
- I bring the signal inside through a flat window pass‑through into a Tablo 4th Gen OTA tuner/DVR
- Each TV uses a Firestick or Roku with the Tablo app to watch, pause, and record live TV
If your towers are similar in distance and lined up mostly in one direction, there’s a good chance this same combination will work well for you too.
The other question to ask yourself right now is: “Who will help me with the physical installation?” As a senior, you may not want to climb ladders or be on the roof—and that’s completely fine. In my case, my grandson and son‑in‑law handled the outdoor ladder work and running the cables, while I focused on the indoor setup.
Once you’ve checked your towers with the RCA Signal Finder app and thought through who will help with the installation, you’re in a great position to move on to choosing your exact equipment and following the step‑by‑step story of how I put it all together.
Why You Might Want to Cut the Cord Too
Let me guess: you’re not trying to be a tech expert—you just want to watch the channels you care about without feeling nickeled and dimed every month. Maybe, like me, you started with cable, switched to streaming to “save money,” and then watched those streaming prices climb right back up.
My TV bill reached almost $100 per month just for the same familiar channels I’d watched for years. If you’re retired or on a fixed income, that kind of money every month really matters. Even if you’re not retired, it’s frustrating to see that much go out the door for something you barely think about—until the bill arrives.
You might be asking yourself questions like:
- “Why am I paying so much when I mostly watch local channels?”
- “Is there any way to get real savings without turning my TV setup into a science project?”
- “Will this even work where I live, especially if I’m in a rural area?”
Those were my questions too. I didn’t want a complicated mess of wires or some fragile setup that only worked on a good day. I wanted something you probably want as well: a simple, reliable way to watch TV and save real money.
That’s what pushed me to seriously look into how to cut the cord and save money using an antenna and a network tuner. The big surprise was learning that, with the right equipment, you can often get better‑looking HD picture quality than cable or streaming, and you can do it even when you’re 35–50+ miles from the towers.
How I Chose the Right Antenna for My Home
Once I understood my towers were about 35 to 52 miles away and mostly grouped in one direction, I knew I needed more than a cheap stick‑on indoor antenna. If your situation is anything like mine—especially in a rural or semi‑rural area—this is an important step.
Here’s how I approached it and how you can think about your own setup:
- I checked an online antenna map with my address to see where the towers actually are and how far
- The map showed my main broadcast towers clustered in one direction to the north‑northwest
- That told me I should look for a directional antenna designed to pull in signals from farther away in a specific direction
I ended up choosing the RCA Compact Outdoor or Attic Yagi. I liked this model for two big reasons:
- It’s designed for outdoor or attic use, so I had flexibility if my landlord said “no” to an outdoor mount
- It has an adjustable mast and a compact size, which makes it easier to place and aim
If you’re renting or worried about drilling holes, that kind of flexibility is a big plus. You get to experiment without locking yourself into something permanent right away.
Getting Landlord Approval and Mounting the Antenna
Like many people, I wasn’t sure how my landlord would feel about an outdoor antenna. You might have the same concern. Here’s what I did:
- I explained that the antenna would be mounted neatly on the eave, not directly on the roof
- I made it clear there would be no big holes or major damage, and that it could be removed cleanly if I moved out
Once he understood it was a small, tidy installation, he agreed.
We mounted the RCA Yagi on the corner eave on the northwest side of the house, which gave the antenna some height and a clear view toward the tower cluster to the north‑northwest. When you do this at your home, think about which side of the house faces your towers, how to get some height while keeping things safe, and how you’ll run the coax inside without making a mess.
My First Test Without a Preamp (And Why It Didn’t Work)
Even though the signal tools and AntennaWeb.org recommended a directional antenna with a preamp for my location, I’ll be honest: I hoped to skip the preamp at first and save a few dollars. Maybe you’re thinking the same thing.
So I wired it this way:
- Antenna on the eave
- Coax down into the house
- Straight into my Tablo TV 4th Gen OTA tuner/DVR
- No preamp at all
Then I ran a channel scan.
The results? Not good. I could only get one network consistently. Some channels came in occasionally, but they weren’t reliable enough to actually watch every day. Others didn’t show up at all. That experience taught me a key lesson you can benefit from: when the coverage tools say you need a preamp, they’re usually right.
Adding the Televes Mast Preamp and Fixing the Problem
To fix the weak reception, I added a Televes Tforce mast preamplifier. This is the piece that made everything come together.

What I like about this preamp and how it’s set up:
- It mounts directly on the antenna mast, just below the RCA Yagi
- It’s powered over the same coax cable that carries the TV signal, so there’s no power outlet needed near the antenna
The wiring is simple once you see it:
- A short coax jumper connects the antenna to the Televes preamp on the mast
- From the preamp, the main coax cable runs down the mast and into the house
- Inside, near the Tablo, a short coax connects the incoming cable to the Televes power supply, and then from the power supply to the Tablo

Once I installed the preamp and rescanned for channels, the difference was dramatic. I went from one reliable network to consistently receiving the major networks, including ABC, CBS, and NBC, plus many more channels. What had been a “maybe this will work” experiment turned into a solid, everyday TV solution.
If you’re in a similar distance range from your towers, adding the right preamp can be the difference between frustration and success.
Bringing the Cable Inside Without Drilling
The next challenge was getting the antenna signal inside without drilling holes in the house—something many renters and homeowners want to avoid.
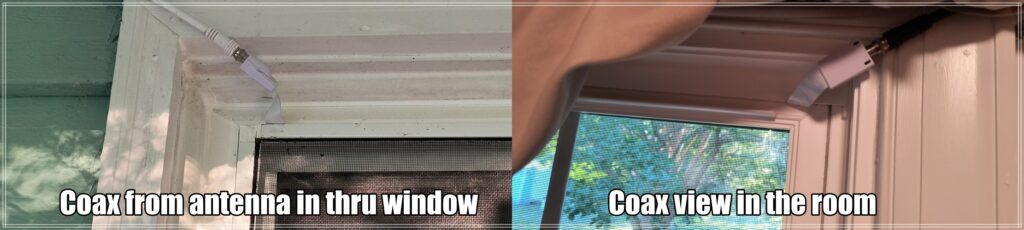
My solution was a flat coax window pass‑through cable:
- The coax from the preamp runs down the outside of the house to the laundry room window
- At the window, I use the flat pass‑through cable so the window can still close and lock normally
- Inside the laundry room, a short coax jumper connects from the window to the Televes power supply, and then into the Tablo 4th Gen tuner/DVR
From the inside, the whole thing looks clean and simple: just a short run of coax from the window to your equipment. No holes, no major alterations, and nothing your landlord will panic about.
Using Tablo as the Brain of the Whole System
Once the signal was coming into the house, I needed an easy way to watch it on every TV without running coax all over the place. That’s where the Tablo TV 4th Gen OTA tuner and DVR comes in.
Here’s what I did:
- Connected the coax (through the preamp and power supply) into the Tablo in the laundry room
- Used the Tablo app on my smartphone to connect Tablo to my Wi‑Fi network
- Ran a channel scan so Tablo could find all the OTA channels
When the scan finished, Tablo showed a lineup of 148 channels—not bad at all for a rural area. This included all the major networks plus a bunch of subchannels with classic TV, movies, and specialty programming.
Tablo then acts as the hub:
- It pulls in the antenna signal
- It lets you watch, pause, and record live TV
- It streams that live and recorded TV over your home network to any supported device
This is where you really start to feel like you’ve found a modern way to cut the cord and save money, instead of going backward to an old‑fashioned setup.
Watching on Every TV with Firesticks and Roku
To get live TV in every room, you don’t need extra antennas or coax runs. You just need inexpensive streaming devices and the Tablo app.
Here’s how I use it in my home:

- Each TV has either an Amazon Fire TV Stick or a Roku device plugged in
- On each device, I installed the Tablo app from the app store
- I opened the app, connected it to my Tablo, and that’s it
Now, every TV in the house:
It feels just like using a streaming service—but the local channels and most of the programming are coming in free, over the air.

Aiming the Antenna with the RCA Signal Finder App
Even with the right antenna and preamp, aiming matters a lot. Guessing can cost you channels. To avoid that, I used the RCA Signal Finder app on my smartphone.
You can do the same:
- Install the RCA Signal Finder app on your phone
- Enter your address into the app
- The app shows you exactly where your broadcast towers are on a map
- While standing at the antenna, rotate it until it points directly toward the tower cluster, using the app and your phone’s compass for alignment
When I aimed my RCA Yagi toward the north‑northwest tower cluster shown in the app and then ran a channel scan, I got a strong lineup right away. A small tweak—rotating the antenna just a few degrees and scanning again—added even more channels and improved signal reliability.

Why Over‑the‑Air HD Often Looks Better
One thing that really surprised me—and might surprise you too—is how good over‑the‑air HD looks compared to some cable and streaming services.
In my setup, OTA channels often look:
- Sharper, especially on sports and fast action
- Cleaner, with fewer compression artifacts and blocky areas
- More vibrant, with brighter and more accurate colors
Over‑the‑air broadcasts are often less compressed than many cable and streaming signals, so on a modern TV that can make a very noticeable difference. If you’ve been assuming cable or streaming always looks better, you might be pleasantly shocked when you see a strong OTA signal side by side.
Handling the One Channel I Couldn’t Get OTA
Even with 148 OTA channels, I had one must‑have channel I couldn’t get over the air: Fox News. You might have your own “one channel” that matters most to you.
Instead of going back to a full cable or expensive streaming bundle, I asked a simpler question: “What’s the cheapest way to get just that one channel?”
My solution was a minimal Sling TV plan that costs under $5 a month and includes Fox News. Paired with my antenna and Tablo setup, this gives me:
- All my local channels and subchannels for free over the air
- A modern DVR and whole‑home streaming experience through Tablo
- That one missing channel through a very small streaming subscription
This kind of hybrid setup is a powerful way to cut the cord and save money without giving up something important to you.
Cord‑Cutting Equipment Checklist (What I Used and Why)
Here’s a simple checklist you can reference or adapt. You can add approximate price ranges and affiliate links when you publish.
Antenna and Mounting
- RCA Compact Outdoor or Attic Yagi Antenna
- Directional design for towers 35–50+ miles away
- Compact enough for outdoor eave or attic use
- Mounting hardware / mast
Signal Boosting
- Televes Tforce Mast Preamplifier
- Mounted on the mast just below the RCA Yagi
- Boosts weak OTA signals from more distant towers
- Televes Power Supply (indoor)
Coax and Cable Entry
- Outdoor‑rated coaxial cable
- One main run from preamp down to the entry point
- Short jumper from antenna to preamp on the mast
- Flat coax window pass‑through cable
- Brings the signal through a closed window
- Ideal if you rent or don’t want to drill holes
- Short indoor coax jumpers
Network Tuner and DVR
Streaming Devices for Each TV
- Amazon Fire TV Stick or Roku device for each television
Optional Streaming Add‑On
- Minimal Sling TV plan
Before and After: What I Actually Saved
To put it all into perspective, here’s my real “before and after”:
- Before: Streaming TV bill of around $100 per month for locals plus many channels I barely watched
- After: Antenna + Tablo + preamp (one‑time equipment costs), plus a Sling plan under $5 per month for Fox News
The equipment pays for itself over time, and each month I keep more of my money instead of sending it to a TV provider. If you’re in a rural area, retired, or just tired of bills that never seem to stop climbing, this kind of setup can make a very real difference.
Ready to Try This Yourself?
If you’ve read this far, you’re probably more than just curious—you’re ready to finally try this for yourself. You’ve seen exactly how I used an antenna, a preamp, a Tablo DVR, and a few streaming devices to cut the cord and save money every single month, even in a rural area and even as a retiree on a fixed income.
You don’t have to rebuild everything overnight. Start with the first steps: install the RCA Signal Finder app, check your towers, and decide who can help you with the ladder and outdoor work. Once you see that your home can get the channels you care about, you’ll have every reason to feel excited to finally try this and turn your TV from a constant bill into a one‑time project that pays you back month after month.
Equipment List for My Cord‑Cutting Setup
Below is the exact equipment I used in my real installation. I’ve provided Amazon links for each item so you can find the same or similar products easily. Simply click on each item and another tab will open with the amazon screen visible.
- RCA Compact Outdoor or Attic Yagi Antenna
- above includes Antenna mast / mounting kit (for eave or wall mount)
- Televes Tforce mast preamplifier
- included in above preamplifier Televes indoor power supply
- Outdoor‑rated RG‑6 coaxial cable:
- One length from the antenna/preamp down to your closest window (measure this distance on your home)
- One length from inside the window to the power supply/Tablo location (measure this indoor run as well)
- Flat coax window pass‑through cable
- Short RG‑6 coax jumpers (for antenna → preamp, window → power supply, power supply → Tablo)
- Tablo TV 4th Gen OTA tuner and DVR
- Amazon Fire TV Stick (for each TV you want to connect)
- Roku streaming device (optional, for TVs where you prefer Roku)
- Sling TV minimal plan (optional, for Fox News or any one channel you can’t get OTA)
For my setup the approximate total cost was: Only a little over $200 – (yours will vary on type of antenna and length of coax and how many firesticks you need)
My Cost for cord cutting paid for its self in less than two months!
Disclaimer: As an Amazon Associate, I earn from qualifying purchases. This helps support my blog — at no extra cost to you. Thank you for your support!
If you got something out of this training, feel free to buy me a coffee or two at bio.site/dhash. Thanks a bunch.